Introduction:
Hello folks, and a special hello to my friends coming here from /r/gamecollecting. I thought I would take some time to document the creation of a reproduction cartridge that will work on actual Nintendo hardware. Why create reproductions?
- Play games on authentic hardware to eliminate errors or inaccuracies of emulators
- Experience games that have never seen a release in your region, games that never saw the light of day at all, and homebrew games not licensed by the original manufacturers
- Adds a one-of-a-kind item to your collection
- Gives you some of the tools necessary to get started with ROM hacks or homebrew
- Gives you a chance to be creative in the label making process
Sadly, people in the past have used this method to make counterfeit copies of prototypes or rare games like Stadium Events. Please don't do this, and if you're making a reproduction, please include a line on your artwork that identifies it as a reproduction, so if you trade it away it isn't mistaken for anything authentic.
So, what game will we be making? I've decided on Moai Kun, originally released by Konami in 1990 on the Famicom. It's a puzzle game where you guide the character to the exit on each single-screen level after rescuing some.. things. There are various bad guys, some weapons, and your very limited ability to jump and use your noggin to smash enemies. This is the type of game where you have a suicide button ("Select" in this case) when you find yourself in an unwinnable situation.


Trust me, you'll be hitting the suicide button often.
|
 Best multicart music in existence is found on this cartridge
|
I originally found this game as a selection on the somewhat common 190-in-1 multicart. This multicart has the Contra logo on a Galaga-style starfield for some reason, with some kick-ass beats. For anyone who's interested, these cartridges basically had a number of different ROMs inside, with a memory mapper and a front-end program that acts as the menu. Stay tuned for an article about making a multicart in the future! Getting back to the task at hand, Moai Kun will also be one of the easiest repros to make because it uses small ROMs that you can easily find drop-in replacements for. Bigger games require a bit of rewiring to work. I'll make sure to cover a more complicated repro in the future. I'll be patching the original ROM with an English translation. It only changes the title screen, but it's good to know how to patch ROMs in case you're planning to make a game with more text in it, like Final Fantasy II for example. |
So let's take a minute to wade through all this NES mapper/header/PCB terminology.
- An iNES header is a few bytes at the beginning of all .NES files that identifies the technical components of the ROM.
- The PCB type is an identifier of what chips are supported on the board. Examples are UNROM, CNROM, TSROM and TLROM. Our game is CNROM. It contains the CHR and PRG ROMs as well as the security chip (aka the CIC) and a simple 74LS161 chip that acts as a mapper.
- The mapper number is an identifier of what memory management logic is used onboard. Examples include CNROM, MMC1 and MMC3. Here's where it gets tricky. For example, Moai Kun is identified with mapper 3, aka CNROM. Now, the chip used for memory management on a CNROM board is not called "CNROM", rather it's a 74LS161, which is a simple 4-bit binary counter. The majority of NES games use MMC1 or MMC3 as their mapper, and that IS the name of the chip. TSROM and TLROM boards use MMC3, for example.
So how do you identify a suitable donor? Find compatible donor cartridges by searching using "PCB Name" under "PCB / Hardware" on the wonderful NesCartDB or by matching information on the Bigass NES Mapper List on TuxNES.
Now that I know that the PCB type for a Moai Kun cart is CNROM, I'll search that up in NEScartdb, and also filter by "US releases" (I'm Canadian, and so are most of my games, but there will likely be more results for US releases, and they are 100% identical in Canada except for maybe packaging differences). If you don't find a suitable donor searching for "CNROM", make sure you also search for "CN-ROM".
Stuff you will need:
1) A compatible donor cartridge. Use the wonderful NEScartdb to find compatible boards. Moai Kun happens to be missing from NEScartdb, but I can open the ROM in an emulator to view the mapper type, which is a major clue to finding the right type of board, or I can check the Big Ass NES Mapper List, which does indeed list Moai Kun, as CNROM (3). The (3) means it's known as mapper 3 in the iNES header world. I've picked a copy of "Fisher-Price I Can Remember" as my donor. I got it for a $1, it's useless to me as a game, it isn't hard to find by any stretch of the imagination and the label was ripped. Perfect!

I Can Remember the last time I played this game. Never.
2) An EPROM programmer, EPROMs and a UV eraser. First, the programmer. Most hobbyists just go for a cheap-o Willem clone programmer. These things are like the Swiss Army knives of programmers, able to handle a ton of chips, and even more if you by some adapters. I think mine was around the $40 mark on eBay.
Please note! I get a lot of questions about these cheap EPROM programmers and mine eventually bit the dust a few days ago. I've since replaced it with a GQ-4X which is dip-switch-less and so far has been rock solid.

Sadly, most of you will realize your laptops have no parallel port. Get off my lawn.
 Yep, all the memory is in that tiny space viewable in the window. |
3) EPROMs. Electrically Programmable Read-Only Memory chips come in many sizes, and have been used for decades so as long as you have an eraser you can probably find some among your junked electronics. Some easy sources are old NIC cards, which typically have a 27C256 or 27C512. You can easily identify EPROMs by their window, although typically they will be covered by a piece of tape. I'm starting with a pair of 27C512 EPROMs I took off a dead JAMMA arcade board. What EPROMs will you need? Well, most (all?) Nintendo games use 2 ROMs: a CHR and PRG. CHR is the character ROM, which holds graphic information. The PRG program obviously holds the program. You need to obtain EPROMs that will hold your intended game. For our example, Moai Kun, the aforementioned databases tell us that both the CHR and PRG ROMs are 32kB, that is, 32 kilobytes each. However, EPROMs are marked in bits, not bytes. The "27C" and "27" series of EPROMs are 8 bits wide, and since we need 32 kilobytes, 32 x 8 = 256 bits. So at a minimum we need chips labeled as 27C256. I'll be using a 27C512 and 27256 since it turned out my other 27C512 is fried, and of course I'll show you how to account for these things. |
4) Next you'll likely need a UV eraser. Get this even if you buy new chips, because it's entirely possible you'll make a mistake or two and need to erase them. Mine is again from eBay, about $20, and it's just a simple circuit that runs a UV bulb on a timer. The timer is broken on mine so I have to keep watch. So once you have your chips, remove the stickers and clean the windows with something like Goo Gone. I find 15 minutes is usually a good amount of time to erase a pair of chips, however, like ovens, your baking time may vary.
5) A 3.8mm Nintendo Security Bit. Only around $4-8 on eBay, opens many different video game cartridges. The larger, 4.5mm versions are for SNES systems (not cartridges) and a few others.

6) Soldering iron, desolder tool of some sort, solder, maybe some wire, standard hand tools.
7) The ROM. Do a search on google to obtain your ROM. Also obtain any patches you will require for translations etc. Patches come as an IPS file.
8) Creativity. You'll probably want to make up your own artwork, so start thinking about that ahead of time.
The process
 |
1) Open up your game. Use really skinny neednose pliers or your game bit. Don't lose these screws! Inside you'll see the CIC (security chip), the mapper (which is a binary counter), and the CHR and PRG ROMs. |
 |
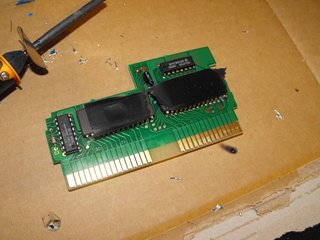
2. Remove the two ROM chips, but leave on ALL other components. 2a. Unless you have a fancy IC removal tool of some sort, just cut off the chips by either using a dremel or tiny cutters. I use a dremel, which cuts through the legs pretty darn quick so be careful not to slip and cut any traces on your board. If you do cut any traces on the board, you'll need to repair them later by running wire. 2b. Now remove the legs that are still soldered in. There are a few methods for this. Most people recommend getting some "helping hands", and using that to hold your PCB while you heat the underside and pull the legs out the top side with pliers. Personally, I use the banging method. I turn the PCB upside down, then heat each pin and bang my hand (the one that's gripping the PCB) on the table, which empties the hole. This is potentially dangerous, and bouncing legs could burn your hand, so don't do it this way! |
 |
3. Desolder the holes so you'll be able to easily insert your chips. Hold your PCB up to the light to make sure light shines through! Clean up any other traces of solder that are lying around on the board. |
 |
4. Erase your EPROMs if you suspect they aren't empty. While I'm sure long, long exposure to UV light could eventually damage the EPROMs irreversibly, I can't say I've ever heard of that actually happening. Remember that UV light is damaging to skin, so be safe and avoid exposure. Anyway, I generally like to toast mine for about 15 minutes as I mentioned before. |
|
|
5. Patch your ROM if you need to. Use a patching tool to apply the .IPS file to your .NES file. Run it in an emulator to make sure you haven't corrupted your file, and to make sure the patch has been applied correctly. In my case, I can see the title has been changed to English. Usage of IPS from Zophar's Domain: C:\nes>ips moaikunJ.nes moaieng.ips moaikunE.nes where moaikunJ.nes is my original Japanese ROM, moaieng.ips is the English translation patch, and moaikunE.nes is the output English ROM.
|

6. Split your .NES into it's CHR and PRG files. I use the DOS utility tniNES also at Zophar's Domain, I'm sure there are some Windows ones that would work just fine. Here's an example of tniNES usage:
C:\nes>tnines -s moaikunE.nes
Which gives you moaikun.PRG and moaikun.CHR.
7. Optional: if your EPROMs are bigger than your ROMs, you should double up the ROM size until it fills up the EPROM. So, I'm using a 27C512 which holds 64kB, so I have concatenate my files to be that large. Simple to do in a DOS window with the built-in "copy" command:
C:\nes>copy /b moaikunE.chr + moaikunE.chr moaibig.chr
This line concatenates moai.chr onto itself, and saves it as moaibig.chr. Don't forget the /b switch, this is necessary to inform the program it's not a text file. If you final files are 4kB, it means you forgot the /b switch.
Why is this necessary? Basically you can't count on the NES to ground the upper address pins. For example, if I only write the lower 32kB to the chip, and the NES decides to send A15 high, then it'll read empty space! Better to put the same info in each chunk so there's no guesswork. You could simply bend out the A15 pin and wire it to ground, but that's more work.
8. Ok, time to burn these new ROMs.
8a. Install your EPROM burner program. If you're using a Willem programmer with a parallel cable, there are a few hoops you have to jump through.
- First of all, don't use the USB cable, it's only used for power and it's not strong enough. Find a 9-12V adapter to plug in. If it doesn't light up, it's the wrong polarity.
- You need to match your software with the board revision that you purchased. I don't think you'll cause damage if you use the wrong one, but it won't work.
- Install this TVicPort software, then reboot
- Download io.dll from this site, copy over io.dll from that zip file into the Program Files/EPROMxx directory, overwriting the old one. If you get "privileged instruction" errors in the Willem programmer, you didn't do this correctly.
- Install xp_stop_polling.reg from this page, which is also a good general Willem resource. If you red and green lights are consistently on, you haven't done this.
8b. Check to make sure your EPROMs are empty. Typically your program will simply have a Blank Test. Test each EPROM to make sure.
8c. Burn these ROMs! Pick your EPROM type, set your dipswitches, then put in your first EPROM, blank check again to make sure it's empty, then write the PRG file. Your program will likely verify it for you by reading the whole chip again. If it works, move on to your other chip. If it didn't work, there's a good chance the erasing procedure didn't work, so bake your EPROM (for longer than you did before, probably) and try again. Still having problems? Bump up the RW and CW periods in your program. It's likely your old EPROMs require more writing time.
After trying to write and erase one of my 27C512's multiple times and getting errors each time upon verifying, I decided it was fried and moved on to another chip. I found a 27256, which is essentially the same as a 27C256. So when burning this one, I used the original .CHR file, not the concatenated one, since the original file matches the EPROM size.
8d. Cover your EPROMs with tape. I often use little labels so I can keep track of which one is CHR and which one is PRG.
9. Solder your ROMs into place. You'll notice that CHR and PRG are written next to the spot where those chips belong. The notch in the EPROM faces to the right, following the silkscreened notch printed on the board.
10. The big moment! Reassemble your NES cartridge and pop that sucker into your NES, and switch 'er on. Remember that your new NES game is just as flaky as an old one, so fiddle around with it if it doesn't work right away.

10a. If your game appears to play but the graphics are messed up, there are two possibile problems. First, check to make sure all the traces are working to your CHR EPROM. You can use a multimeter to check each pin against the edge connector, and make sure to clean the edge connector. Second, it's possible your game uses different "mirroring". See this little blob at the top of your PCB? You may have to desolder this blob and solder a bridge across the other one. Check one of the databases to see if your intended game and donor cartridge use the same mirroring.
10b. If you get nothing much to speak of, check your PRG ROM and clean the edge connector. Sadly, if that all turns out ok then it's likely your EPROMs didn't burn correctly, or something got damaged by static electricity or something. Technically, as long as your chips verified correctly in your EPROM burning software, it should work. Make sure you didn't ruin any traces on your PCB.
 |
11. Finally, all that's left to do is make a label. 11a. I've made one in Photoshop from a template. I tried to emulate the black box style seen on many early games. You and right-click and save on the image on the left, it's actually a higher-resolution that I've scaled down for viewing. 11b. I've found the best way to attach these to a cartridge is to get a few sheets of full-page adhesive inkjet paper and print it yourself or get it printed somewhere. Then get a few sheets of laminating sheets. Cut out a piece of the lamination and stick it over the adhesive paper, then cut the sticker out. Then it's just peel and stick. Try not to handle the edges too much or it'll lift eventually. |
That's it! Hope you enjoyed my article. Stay tuned for at least two more NES projects. The first will be a more complicated repro involving bigger chips, and the second will be a simple multicart that can hold several games, using a PIC chip to cycle through the choices.

I am happy to answer any questions and provide a little help if you need it, just